
From TVs remotes and flashlights to gaming controllers and wireless devices, daily electronics depend on batteries. Often the cause of a device failing is a dead battery. Testing batteries can help ascertain whether they still have charge or need replacement instead of substituting batteries mindlessly.
Testing AAA batteries requires no professional tools; it is easy. In a few minutes you can check the battery’s condition using a multimeter, battery tester, or quick drop test. This guide will walk over several methods to test a AAA battery, so saving you money and time from pointless replacements.
Understanding AAA Batteries

Knowing the several types of AAA batteries available helps one prepare for testing one of them. Different voltage levels and lifetime of each type can influence their testing conditions.
Types of AAA Batteries
- Alkaline AAA Batteries
- Often found in domestic appliances
- Non-rechargeable
- Starts at 1.5V and progressively loses charge with time.
- Lithium AAA Batteries
- robust and light-weight
- Not reusable
- More costly but works well in high-drain systems
- NiMH (Nickel-Metal Hydride) AAA Batteries
- Rechargeable running a standard voltage of 1.2V
- Found in high-drain devices including game controllers and cameras.
- When properly stored, retains power more than alkaline batteries.
Rechargeable batteries might seem dead in some tests even if they are really functional since their voltage (1.2V instead of 1.5V) remaining charge amount is less. Knowing these variations helps one to properly understand test findings.
Methods to Test a AAA Battery
One can find whether a AAA battery still has charge in a car battery a number of ways. Let us review the most successful techniques.
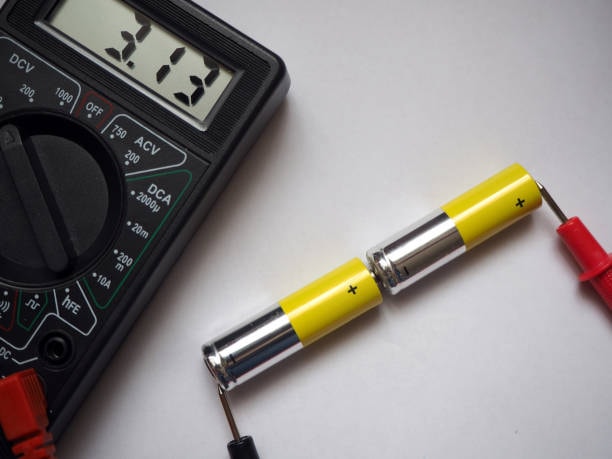
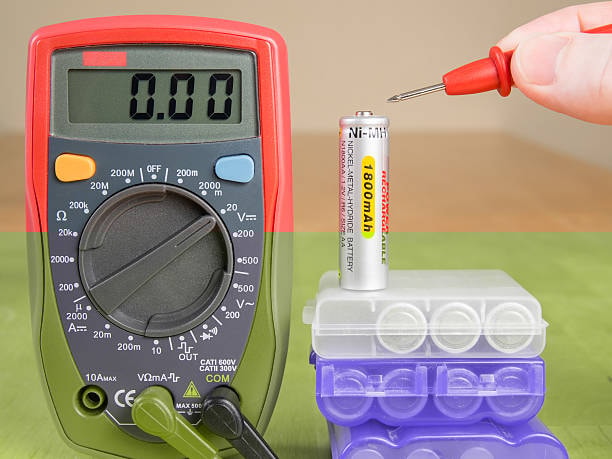
1. Using a Multimeter (Most Accurate Method)
One should use a multimeter (most accurate method).
Step 1: Gather Your Tools
- Either a digital or analog multimeter.
- The AAA battery slated for testing
Step 2: Set Up the Multimeter
- Change the multimeter dial to DC voltage mode (symbol: “V” with a straight, dashed line).
- To precisely gauge a 1.5V battery, set it in at least 2V voltage range.
Step 3: Measure the Battery Voltage
- Touch the red probe to the battery’s positive terminal—that of a flat end.
- Press the black probe against the button end, the negative terminal.
- Examine the voltage shown:
- Between 1.5V and 1.6V the battery is completely charged.
- The battery is weakening although having some charge 1.2V – 1.4V.
- Under 1.2V: The battery should be replaced or recharged (if rechargeable; it is almost dead).
Usually reading between 1.2V – 1.3V, a fully charged rechargeable NiMH battery will read normal for this kind.
2. The Drop Test (Bounce Test)
One quick approach to find whether an alkaline AAA battery is dead is the drop test. The internal chemistry of an alkaline battery changes when it discharges, so influencing its bounce.
Step 1: Hold the Battery Upright
- Hold the battery six inches above a hard, level surface.
Step 2: Drop the Battery
- Drop it vertically with the negative terminal (button end) down.
Step 3: Observe the Bounce
- Good Battery: Lands thumpingly and might only bounce slightly.
- Dead Battery: Bounces several times or falls readily over.

3. Using a Battery Tester
A battery tester is a little, portable tool with an instantaneous reading of the state of a battery.
Step 1: Insert the Battery
- Slot the AAA battery in the tester.
Step 2: Read the Indicator
- Usually having a needle gauge or an LED display, battery testers:
- The battery is in good green zone.
- Yellow Zone: The battery might have to be replaced shortly; it is weak.
- Red Zone: The battery dies.
Without technical knowledge, this is one of the easiest and most dependable methods to test AAA batteries.
4. Testing in a Working Device

Should you not have a tester or multimeter, you can check good condition of a battery by plugging it into a known to be working device.
Step 1: Choose a Device
- Use a remote control, flashlight, or another AAA battery running device.
Step 2: Insert the Battery
- Install the battery and test device turning on..
Step 3: Observe Performance
- Should the gadget be in good working order, the battery is decent.
- Should the gadget prove to be weak or unresponsive, the battery might be defective.
- To be sure the old battery is really dead, try changing in a new one.
5. Using a Battery Checker App (For Rechargeable Batteries)
For rechargeable AAA batteries, some brands offer battery checker apps or smart chargers that display charge levels. If you use rechargeable batteries frequently, investing in a smart charger can help monitor their condition.
Batteries as Voltage Sources in Circuits

When building circuits running on batteries as power sources, we usually presume the battery acts as a perfect voltage source. This presumption holds that independent of the electrical load connected to the battery, the voltage at its terminals stays constant. In a perfect world, independent of the amount of current extracted from the battery, it would offer a constant voltage free from fluctuations.
The Concept of an Ideal Battery
Changing the load resistance (RL) should not affect the voltage recorded across the terminals of a battery if we consider it as a totally ideal voltage source. This implies that the battery should keep a constant voltage output whether a significant or a small resistance is coupled to ac voltage. Real-world batteries, however, do not operate in this exactly ideal manner because of several limiting factors affecting their performance.
Real-World Limitations of Batteries

Practically speaking, a battery’s capacity to deliver a constant voltage under varying loads depends on several elements. Among these fundamental elements are:
- Larger batteries can offer more current and usually have less internal resistance.
- Internal resistance and efficiency vary depending on the battery chemistry—that of alkaline, lithium, or nickel-metal hydride.
- Age and Use: Internal resistance rises in batteries as they age and go through repeated charge and discharge cycles, so lowering their efficiency.
- Extreme temperatures can affect the capacity of a battery to provide current effectively; cold temperatures increase internal resistance and so lower performance.
We can simulate a real battery in a circuit as an ideal voltage source with an internal resistor (RI) coupled in series to more precisely depict its behavior. Voltage drops rated voltage up in the battery caused by this internal resistance influence its whole performance by affecting the flow of current through it.
Battery as a Voltage Source with Internal Resistance

An ideal voltage source in series with an internal resistor (RI) forms a more reasonable model of a battery. This series resistor considers the internal chemistry, materials, and structural components of the battery causing resistance inside. This internal resistance has no effect on the terminal voltage in a circuit devoid of current. But a voltage drop across the internal resistance results when a load is connected and current starts to flow, so lowering the voltage available at the terminals of the battery.
Measuring Open-Circuit Voltage (VOC)

First, we measure the voltage of the battery in an open-circuit condition—that is, without a load connected—to grasp the impact of internal resistance. Considered the open-circuit voltage (VOC), this voltage shows the potential difference measured voltage from across the terminals of the battery when no current is being drawn.
Why Open-Circuit Voltage is Important
There is zero volts voltage drop across the internal resistor (RI) when no external load is connected since no current flows through the circuit. Under open-circuit conditions, then, we consider the open-circuit voltage (VOC) to be equal to the battery’s ideal voltage source. When figuring out the voltage drop under loaded conditions, this measurement offers a baseline for comparison.
Voltage Drop Under Load Conditions
Current starts running through the circuit when a load—such as a resistor—is hooked to aa cell the battery. Consequently, measured at the terminals of the battery, the voltage drops relative to the open-circuit voltage. The internal battery resistance directly determines this drop in voltage.
Example: Measuring Voltage with a Load
Assume we run a load resistor or 4-ohm resistor (RL) across battery terminals. Measuring the voltage across the terminals of the battery with this load attached results in a lower voltage than in the open-circuit voltage. The internal resistance of the battery causes a voltage drop when current passes through it, hence lowering the voltage.
How to Prepare for Battery Testing
Following a set of preparatory actions guarantees accurate and consistent results before doing a battery test. Good preparation not only enhances the precision of your measurements but also helps avoid possible problems that might cause misreading of the battery’s condition. These instructions will help you to determine the kind of battery, do a visual check, and arrange the required testing tools.
Step 1: Identify the Battery Type and Specifications
Finding the precise kind of battery you are handling comes first in getting ready for battery testing. Each of the several chemistries and sizes of batteries has different voltage ratings and capacities. Choosing the suitable test method and making sure the obtained readings have significance depend on an awareness of these criteria.
- Determine the Battery Type:
Based on their chemistry and use, batteries fall into several groups. Common kinds are lead-acid batteries, lithium-ion, nickel-metal hydride (NiMH), alkaline (AA, AAA, C, D, 9V). Finding the proper testing parameters will depend on knowing the correct type. - Check the Battery’s Voltage Rating:
Usually found on the battery casing or stated in the user manual, a battery’s voltage rating is printed on Standard alkaline AAA and AA batteries, for instance, have a nominal voltage of 1.5V; lithium-ion batteries often have a 3.7V rating. - Note the Battery Capacity:
Smaller batteries are typically expressed in milliamp-hours (mAh), while larger batteries—such as lead-acid batteries—are expressed in amp-hours ( Ah. This value shows the battery’s capacity for charge as well as its running duration before requiring a replacement or recharge.
By identifying the battery type, voltage, and capacity, you can select the proper testing procedure and interpret your results accurately.
Step 2: Perform a Visual Inspection of the Battery
Visual inspection of lithium batteries is crucial to find any indications of damage, leakage, or other possible problems influencing the test findings before evaluating the electrical performance of the battery. A damaged or defective battery could provide false readings or perhaps endanger safety.
- Look for Physical Damage:
Look for obvious wear on the battery—cracks, dents, or bulges—here. These can point to internal damage that might compromise the battery’s performance or render it dangerous for use. - Check for Leaks or Corrosion:
Look for any indication of corrosion or leakage in the battery terminals and surrounds. Harmful chemicals released by battery leaks can damage electronic equipment. Often white or greenish powdery, corrosion around the terminals can affect electrical conductivity. - Ensure Terminals Are Clean and Free of Debris:
Your test readings may be less accurate if dirt, dust, or corrosion on the battery terminals exists. Before testing, softly clean the terminals with a dry cloth or a small brush if they seem dirty.
By means of a comprehensive visual inspection, possible issues unexpected failures can be found prior to testing, guaranteeing accurate and safe battery evaluation.
Step 3: Set Up the Multimeter for Testing
Since a digital multimeter offers exact voltage readings that signal the state of the battery, it is among the most dependable instruments available for battery testing. Getting a proper measurement from the multimeter depends on its being set correctly.
- Select the Correct Measurement Mode:
Since most batteries run on direct current (DC) voltage, the multimeter should be configured in DC voltage mode (symbolized as V with a straight and dashed line). - Adjust the Voltage Range Accordingly:
Multimeters vary in voltage range. Set the multimeter’s range somewhat higher than the expected voltage of the battery to guarantee correct readings. In one instance:- Set the range of a 1.5V AA or AAA battery to minimum two volts.
- Set the range for a 12V lead-acid battery to at least 20V..
- Connect the Multimeter Leads Correctly:
- Connected to the battery’s positive terminal should be red lead, or positive probe.
- Connected to the negative terminal of the battery should be black lead (negative probe).
Before testing, making sure the multimeter is correctly set will help to avoid erroneous readings and give a fair estimate of the state of the battery.
Final Preparation Checklist
Review the following checklist to be sure all required preparations have been finished before starting the battery test:
Identified are battery type, voltage rating discharge current amount, and capacity.
The multimeter is set to DC voltage mode and a suitable voltage range; battery has been visually inspected for any indications of damage, leakage, or corrosion. Correctly coupled to the battery terminals are multimeter probes.
Following these pre-steps will help you to guarantee that your battery testing procedure is accurate, dependable, and free from common mistakes that might produce false results.
Common Mistakes When Testing AAA Batteries
- Testing straight after use: Warm batteries could show a reduced voltage. Let them cool first then test.
- For battery testing, always operate the multimeter in DC voltage mode.
- Ignoring load testing: Some batteries can show a good voltage but fail under load, so failing to supply sufficient power for a device.
How to Extend AAA Battery Life
- Store cool, dry; heat can reduce battery life.
- Take batteries out of not used devices. increases lifetime and helps to stop leaks.
- High-drain devices require rechargeable batteries. They cut waste and span more years.
Proper Battery Disposal
Dead batteries include dangerous chemicals thus they should never be disposed of in the garbage. instead:
- Many stores and recycling centers welcome used batteries; recycle at approved drop-off sites.
- Mixing old and new batteries can cause leakage and lower general battery performance.
Conclusion
Easy testing of a AAA battery will help to avoid needless battery waste. While the bounce test gives a quick approach to check alkaline batteries, the multimeter test gives the most accurate voltage reading. Another handy approach to find whether a battery still has charge is by using working devices and battery testers. If you regularly use rechargeable batteries, a smart charger with a display can assist in their condition monitoring.
Knowing these testing techniques will help you to save money, cut waste, and guarantee that your equipment stays running. Always dispose of dead batteries correctly; for a more sustainable choice d batteries, think about moving to rechargeable models.